ノーズパッド提案006

こんにちは、m-chanハンドメイドでございます。
アクセスしていただき誠にありがとうございます!!!


まだまだ暑い日が続きそうですね。
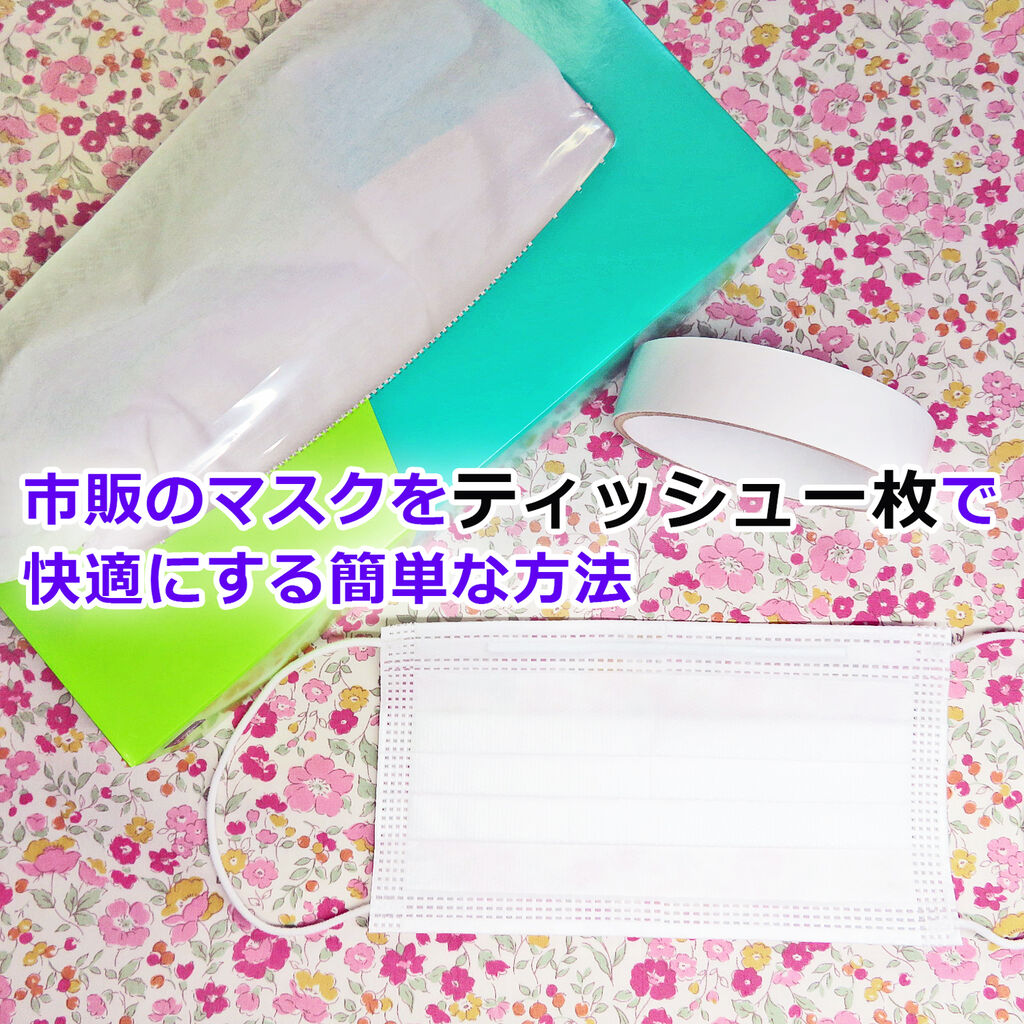
今日はいつもの手作りの息苦しくないマスクではなく市販のマスクや一般的な手作りマスクをより使いやすく楽にする方法をお伝えします。

m-chanハンドメイドをご覧になったりm-chanハンドメイドの息苦しくないマスクを作った方ならもうおわかりかもしれません。
お察しの通り「ノーズパッド」を使います。


その前にm-chanハンドメイドの息苦しくないマスクシリーズのひとつ、
「ノーズパッド付きマスクの作り方と無料型紙ダウンロード」はこちらです。
NPmaskブログ説明日本語0030
画像はその仕組みの図解です。


お待たせしてすみません、それでは本題に入ります。


市販のマスクで不織布のものはたいていノーズワイヤーが入っています。
もちろんワイヤーがあることで滑り止めになったり息を漏らさなかったりメガネの曇り止めになったりととても有用な仕組みです。
しかしこれにノーズパッドを取り入れることでより快適になりますよ。


ノーズパッドの利点
・息が上部に抜けにくくなるので顔の上部に熱い息がかかりにくい。
・その結果メガネも曇りにくい。
・ノーズワイヤーの皮膚への刺激を緩和する。
・鼻の部分がパッドで持ち上がった分口元により空間ができる
・マスクが中高になり鼻が高く見える
・その結果小顔効果が生まれる。→美人に見えるかも

なんだか手前味噌を並べてお恥ずかしいですが、簡単なのでやってみてください。


用意するもの
ノーズパッド提案001

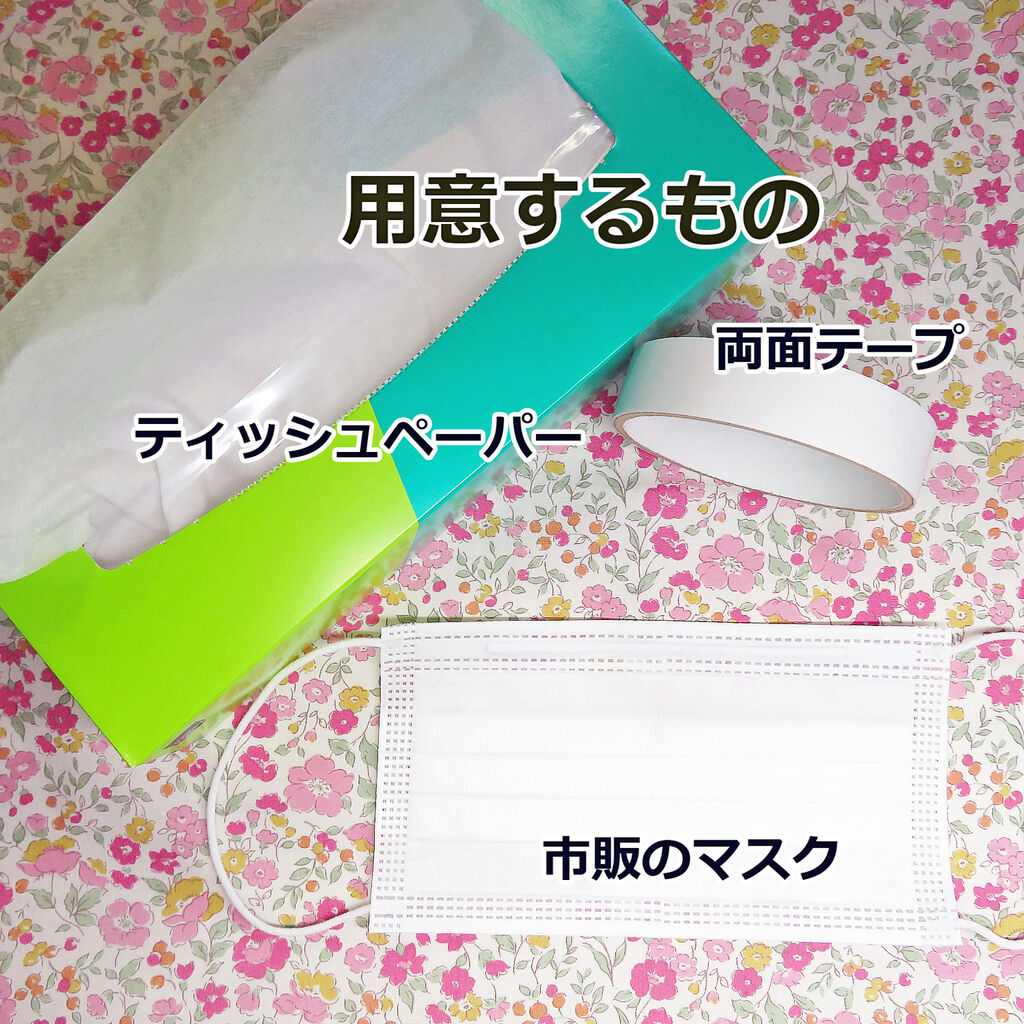
画像は市販のマスクですが市販のマスクでも手作りのマスクでも同じ効果です。


やり方の手順
ノーズパッド提案005

ワイヤーはここでは「W」折りしましたが、諸説あるらしくご自身がぴったりするやり方をしてください。


装着して上から見るとこんな感じです。
ノーズパッド提案003


横から見た感じはこちら、ちょっとわかりにくいですか?
鼻の部分が高くなりますのでその分口元の空間が広くなっています。
ノーズパッド提案004


以上です。

市販のマスクが息苦しい方や暑さがどうしても苦手な方、
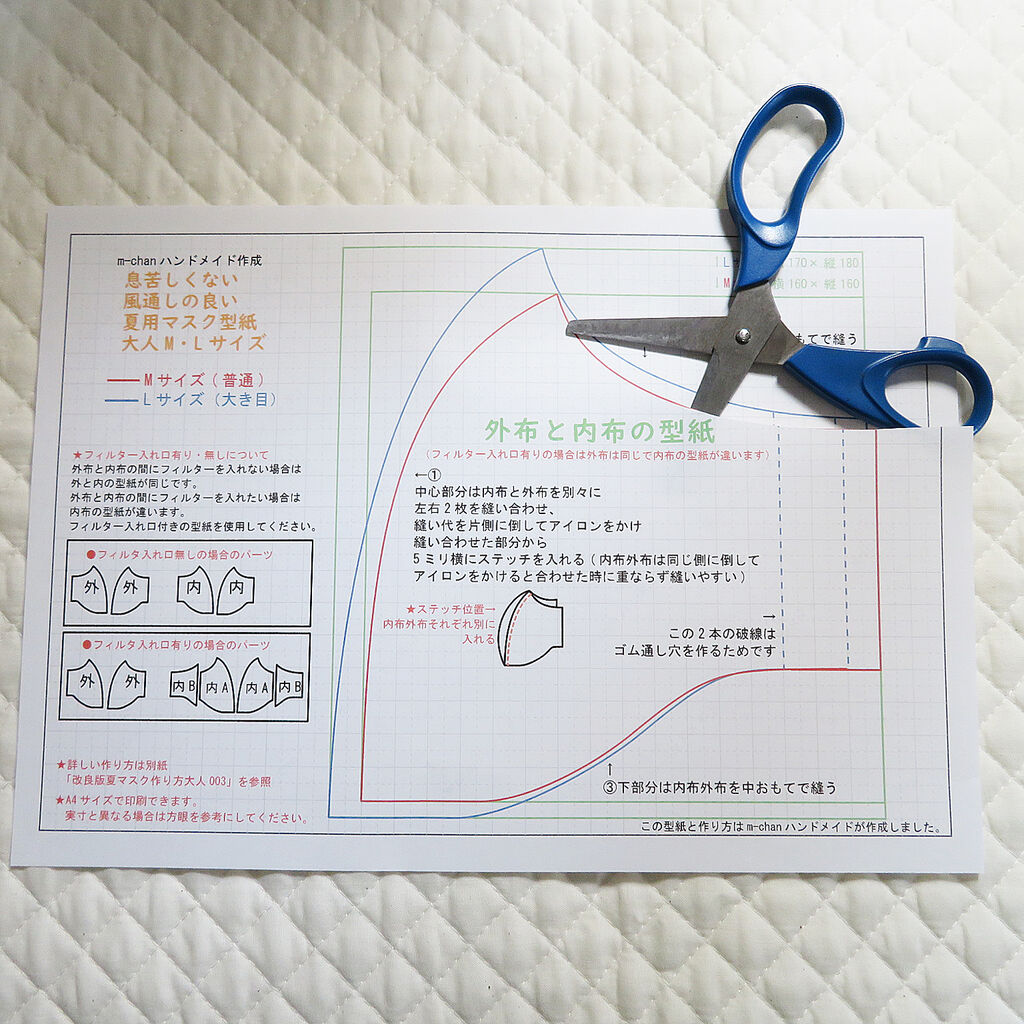
m-chanハンドメイドのノーズパッド付きマスクもよかったら作ってみてくださいね。
この夏私はこの↑手作りマスクで乗り切ることができそうです。


最後までご覧いただきありがとうございました。


ランキングに参加しています。良かったらクリックしてください。 にほんブログ村 ハンドメイドブログへ
にほんブログ村

このエントリーをはてなブックマークに追加 mixiチェック

タナローンマスク001

こんにちは、m-chanハンドメイドでございます。
アクセスしていただき誠にありがとうございます!!!

暑い夏も終わりに近づいてきましたがいかがお過ごしでしょうか?

これまで作った息苦しくない夏用マスクの数々ですが、今回は晩夏に合わせて作ってみましたのでご紹介します。

といってもまだまだ暑さは当分の間続きますので外側の生地はちょっとシックにして裏側はリップルかちぢみにしています。

以前もご紹介したコットンリップルですが、個人的には夏用マスク生地で一番使いました。

リップルは裁断も縫うのも楽ですし肌当たりもさらっとして着用感も軽く、洗った後形を整えて干せばアイロンもいらないくらいです。
お勧めです!

[商品価格に関しましては、リンクが作成された時点と現時点で情報が変更されている場合がございます。]

( コットン )Cool 60’s リップルコットン【 商用利用可 】
価格:495円(税込、送料別) (2020/8/25時点)


ではまず外側の生地を綿ローンで作ったものです。
綿ローンは光沢が美しく軽く優雅で特にリバティのものはお高いけれどもあこがれですね。
マスクですとちょっと目立つかなと思いましたのでなるべく地味目の生地で作りました。
タナローンマスク002


次はコットンの迷彩カモフラ柄です。
これどこに行くときにしましょうかね。ちょっと作ってみたくて作りました。
迷彩マスク001


次はダブルガーゼです。
裏もダブルガーゼだと暑い&個人的にガーゼはむずむずするので表のみです。
チェックやストライプは細かい柄ならあまり気になりませんが
中心の柄の出方を考えて裁断した方がいいですね。
チェックガーゼマスク001


言い忘れましたが今回はすべて手縫いです。下手ですが手縫いは好きです。


そしてこれらの内側の布はリップルかちぢみです。
タナローンマスク003
そしてノーズパッド付き↑です。
やはりノーズパッドは楽です。自分で言うのもなんですが本当にお勧めします。


ノーズパッド付き夏用マスクの型紙と作り方はこちらをご参照ください。

本日は以上です。
ご覧いただきありがとうございました。


【マスクの着け方について】
このマスクは息苦しさを緩和するために下の方に隙間が作れるようにしたものです。
生地にもよるのですが着け心地が悪い場合は
少しゴムを引っ張ってゴム通し部分に適当にギャザーを寄せたり
ゴムの長さを調節して息苦しくない程度の隙間を開けてください。

【必ずお読みください】
・このマスクは侵入による感染を防ぐものではありません。
・このマスクは下側に隙間があり、夏のマスク着用時の息苦しさに対応したものです。
 ソーシャルディスタンスをとって咳やくしゃみをする際は下の隙間を手で押さえてふさいでください。
・小学生以上で必用に応じて自身でマスクの着脱ができる方がご使用ください。
・乳幼児へのご使用はおやめください。
・一度使用したマスクは洗剤を使用して洗ってください。
ランキングに参加しています。良かったらクリックしてください。 にほんブログ村 ハンドメイドブログへ
にほんブログ村


・・・・・・・・・・・・・・・・・・・・・・
★型紙や編み図についてのお願いです★

以下のことはご遠慮ください。
・ご自身のSNSなどでダウンロードできるようにする
・型紙や編み図を販売する
・型紙や編み図のスクショをご自身のSNSなどに掲載する

以下のことはご自由にどうぞ
m-chanハンドメイドの型紙や編み図で作ったり、お子さんの園のバザーなどで販売されたり、お友達に作って販売する。
その場合はm-chanハンドメイドの型紙や編み図であることをどこかに表示してくださいますと嬉しいです。

またご自身のSNSで型紙・編み図をご紹介いただくときはこのブログにリンクさせてください。

何卒よろしくお願いいたします。


このエントリーをはてなブックマークに追加 mixiチェック

NPmaskブログ英語説明サムネ003


Introduction.

Welcome and thank you for visiting my blog. 
I'm a Japanese who doesn't know English well.
This text on how to make pattern paper was created using a translation software.
If you read the instructions and don't understand the text, use your imagination and look to the images on the blog and the illustrations in the PDF file for instructions.

-----------------------------------

Features of this mask

This mask was designed to have a gap at the bottom of the mask to prevent the breath from being trapped in the mask.
When I first designed this mask, it didn't have a nose pad.
My glasses get fogged up with my exhaled breath, so I added a nose pad.
As a result, my exhaled breath goes downward, making it easier to breathe.
Also, in the first design, the lower part of the mask was open, so the mask could not be supported by the chin, thus making the mask unstable, but with the nose pad, the mask was stabilized.

-----------------------------------

How to wear a mask

When you wear the mask, do not wear it tightly to your chin, but leave a space around your chin.
I have made this pattern for a Japanese person and it may not fit your face.
If it does not fit your face, you may need to alter the details to fit you.
This mask is designed with a nose pad to help the mask fit your face when you wear it and to allow your exhaled breath to go down instead of up.
However, if you don't need the nose pads, try wearing the mask without them.

-----------------------------------

Caution

This mask is not intended to prevent infection by bacteria or viruses.
There is a gap at the bottom of the mask to make it easier to breathe.
If you cough or sneeze, please cover the gap underneath with your hand.
Keep your social distance even when wearing the mask.
This product should be used by persons of elementary school age or older who can put on and take off the mask by themselves if necessary.
Do not use on infants.
Once used, please wash your mask with detergent.

-----------------------------------

Now I will explain how to make this mask.

First, download the pattern and instructions for making it.
The pattern is available in four sizes.

This is a patterned paper that can be printed on A4 paper.

This is how to make a mask that can be printed on A4 paper.

This is a patterned paper that can be printed on letter-size paper.

This is how to make a mask that can be printed on letter-size paper.


Patterns have the Seam Allowance included.
Patterned paper can be printed in A4 or letter size.


These are what you need to make this mask

Sewing machine,
Or needles and threads for hand sewing,
Iron,
Scissors,
Pins and pin cushions,
Fabric,
(The fabric shrinks after washing, so before sewing it, soak it in water and squeeze it lightly to dry. Then iron it before it dries completely.)
Elastic cord,
Bodkin,
You can sew it by machine or by hand, whichever method you prefer.

-----------------------------------

How to make a mask.

Cut the printed pattern pieces.
No need to leave a seam allowance around the outside of the mask-it’s been added in-so just cut along the lines of the pattern.

NPmaskブログ説明001


Match the fabric to the inside surface and pin the patterned paper to the fabric.
The other way is to mark the fabrics with tailor’s chalk  etc.
NPmaskブログ説明002


Cut the fabrics with scissors along the pattern.
NPmaskブログ説明003


2 front and 2 back fabrics.
NPmaskブログ説明004


Nose pad pocket fabric is one piece.
NPmaskブログ説明008


Sew the fabrics with the left and right sides facing the front and the center with a 10mm seam allowance.
NPmaskブログ説明005


Make notches in several places on the seam allowance.
Do not cut the seams.
NPmaskブログ説明006


Fold the seam allowance to either side and iron.
NPmaskブログ説明007


Topstitch.
NPmaskブログ説明007-2


Sew the other two pieces on the other side the same way.


Fold the left and right sides of the nose pad pocket by 10 mm and sew.
NPmaskブログ説明009


The nose pad is stitched to the upper center of the inside of the mask body with a 5mm seam allowance.
Sew with care not to sew the seam allowance on the mask body.
The red broken line indicates the position of the seam allowance of the mask body.
NPmaskブログ説明010


Bend the fabric 5mm, sew it in a position of 2cm width without overlapping it exactly.
NPmaskブログ説明011


Align the two pieces of fabrics on the mask body with the inside surface, align the centers and fasten with a pin, and sew with a 10mm seam allowance.
NPmaskブログ説明012


Do the same under the cloth.
NPmaskブログ説明013


Make a cut in the curved part of the seam allowance.
Do not cut the seams.
NPmaskブログ説明014


Fold the two seams allowance on the same side with an iron.
NPmaskブログ説明015


Turn the cloth to the right side.
NPmaskブログ説明016


Make the part through which the elastic cord passes.
Fold in 10mm from the edge.
NPmaskブログ説明017


Fold 20mm on the side that touches the skin and sew to pass the elastic cord.
NPmaskブログ説明018


Thread the rubber string through the hole.
Be sure to tie the elastic cord with a square knot(reef knot).
NPmaskブログ説明019


Insert the folded tissue paper into the nose pad storage area and you're done.

NPmaskブログ説明020


That's all. Thank you very much.

----------------------------------------

About cloth selection for summer mask
NPmaskブログ説明021
Here are some of the best fabrics I've used.
The white cloth at the bottom of the image is called "ripple" and the surface is uneven and it is cool and light for summer.

The outer fabric on the top of the image is a traditional Japanese fabric called Takashima Chijimi(A type of cotton crepe fabric.).
Chijimi is used for summer clothes in Japan.
The inner gray fabric was cut from Uniqlo's AIRism series men's inner shirt.


Notes on using this pattern

Please do not do the following.
Do not make sewing patterns and crocheting patterns and knitting patterns available for download on your social networking sites, etc.
Please do not sell your sewing patterns or crocheting patterns or knitting patterns.
Please do not post screenshots of your sewing patterns or knitting patterns on your social networking sites.

Feel free to do the following
You can make them with m-chan Handmade sewing patterns and crocheting patterns and knitting patterns, sell them at your child's school bazaar, or make and sell them to your friends.
In this case, we would appreciate it if you could indicate somewhere that they are m-chan handmade sewing patterns and crocheting patterns and knitting patterns.

Also, when you introduce sewing patterns and crocheting patterns and knitting patterns on your own social media, please link them to this blog.

Thank you very much for your support.

----------------------------------------


このエントリーをはてなブックマークに追加 mixiチェック

↑このページのトップヘ